【Linux】环境下部署Nginx服务 - 二进制部署方式
👨🎓博主简介
🏅云计算领域优质创作者
🏅华为云开发者社区专家博主
🏅阿里云开发者社区专家博主
💊交流社区:运维交流社区 欢迎大家的加入!
🐋 希望大家多多支持,我们一起进步!😄
🎉如果文章对你有帮助的话,欢迎 点赞 👍🏻 评论 💬 收藏 ⭐️ 加关注+💗

一、下载安装包
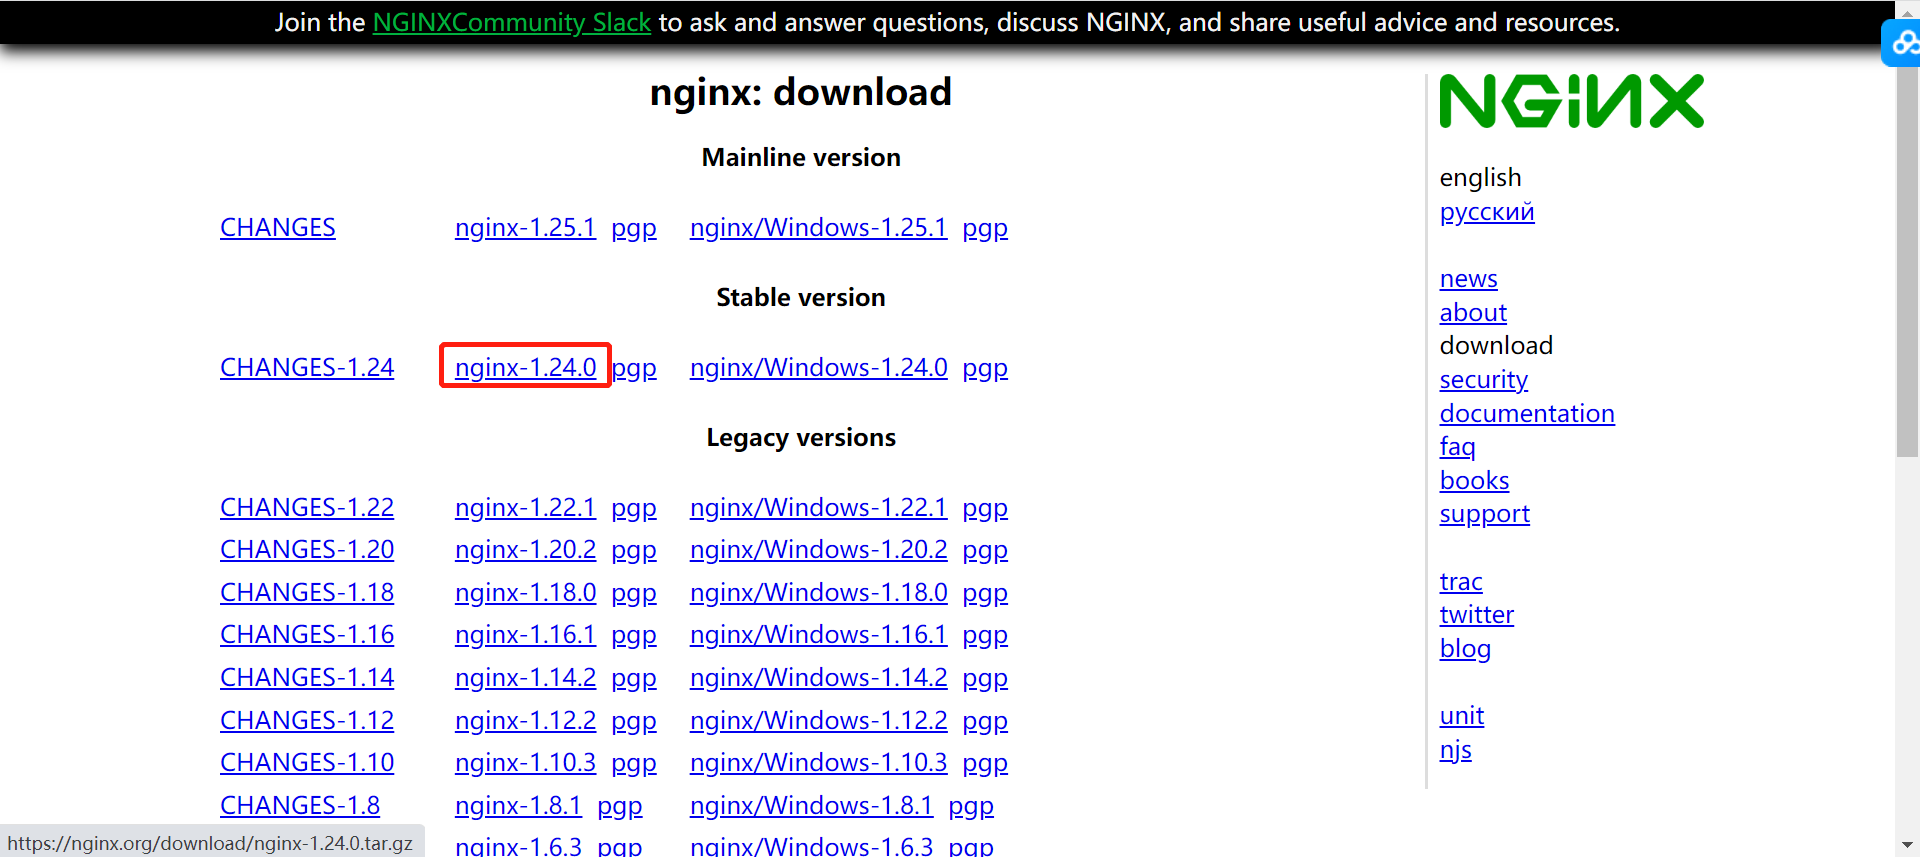
官网下载地址:nginx: download
选择Stable version版本下载到本地(该版本为Linux版本),下载完成后上传到服务器上;
- 或者在服务器上使用wget下载
wget https://nginx.org/download/nginx-1.24.0.tar.gz二、部署Nginx服务
1、安装Nginx服务需要的依赖包
yum -y install gcc gcc-c++ zlib zlib-devel pcre-devel openssl openssl-devel离线包下载地址:nginx1.24.0 二进制安装离线包及依赖包
2、上传解压
(1)sz先把nginx压缩包复制到虚拟机/服务器上
(2)解压nginx压缩包:
tar xf nginx-1.24.0.tar.gz -C /usr/src/(3)切换到nginx目录下:
cd /usr/src/nginx-1.24.03、编译安装nginx服务
指定安装路径然后编译安装,后面的参数可根据自己需求进行安装
./configure --prefix=/usr/local/nginx --with-http_ssl_module --with-http_v2_module --with-http_gzip_static_module --with-http_stub_status_module --with-threads --with-http_realip_module  --with-file-aio --with-http_auth_request_module --with-http_secure_link_module --with-http_slice_module --with-http_sub_module --with-http_addition_module --with-pcre
make
make install

#或者使用下面这一条命令。上面的看着清晰,在哪里错了,易排查问题
./configure --prefix=/usr/local/nginx --with-http_ssl_module --with-http_v2_module --with-http_gzip_static_module --with-http_stub_status_module --with-threads --with-http_realip_module  --with-file-aio --with-http_auth_request_module --with-http_secure_link_module --with-http_slice_module --with-http_sub_module --with-http_addition_module --with-pcre && make && make install
编译安装参数解析:
| 参数 | 功能 | 典型配置 | 使用场景 |
|---|---|---|---|
--with-http_ssl_module | SSL/TLS加密支持 | listen 443 ssl; | HTTPS网站、证书配置 |
--with-http_v2_module | HTTP/2协议支持 | listen 443 ssl http2; | 多路复用、头部压缩、服务器推送 |
--with-pcre | 正则表达式支持 | location ~ \.php$ | URL重写、location匹配、rewrite规则 |
--with-threads | 线程池支持 | thread_pool default threads=32; | 异步文件读取,避免阻塞Worker |
--with-file-aio | 异步文件IO | aio on; directio 512k; | 大文件传输(视频/下载),提升吞吐量 |
--with-http_gzip_static_module | 预压缩文件服务 | gzip_static on; | 提前生成.gz文件,Nginx直接发送,省CPU实时压缩 |
--with-http_realip_module | 获取真实客户端IP | set_real_ip_from 192.168.1.0/24; real_ip_header X-Forwarded-For; | CDN/代理后,后端获取用户真实IP |
--with-http_auth_request_module | 子请求鉴权 | auth_request /auth; | 统一鉴权入口(如JWT验证),未通过返回401 |
--with-http_secure_link_module | 防盗链/安全链接 | secure_link $arg_md5,$arg_expires; | 生成带过期时间的加密URL,防非法下载 |
--with-http_sub_module | 响应内容替换 | sub_filter 'old_string' 'new_string'; | 过滤敏感词、替换域名、A/B测试 |
--with-http_addition_module | 响应内容追加 | addition_types text/html; | 在HTML头部/尾部统一注入代码(如统计脚本) |
--with-http_slice_module | 大文件分片传输 | slice 1m; | 大文件分段缓存/传输,支持断点续传、并行下载 |
--with-http_stub_status_module | 状态监控页 | location /nginx_status { stub_status; allow 127.0.0.1; deny all; } | 查看活跃连接数、请求处理数,对接Prometheus/Zabbix |
三、启动及确认服务是否正常
- 安装成功后,启动Nginx服务:到/usr/local/nginx/sbin目录下,启动服务:
/usr/local/nginx/sbin/nginx -c /usr/local/nginx/conf/nginx.conf- 启动成功后,查看进程
ps -ef | grep nginx- 或者查看端口是否启动(默认端口为80)
netstat -anput | grep 80
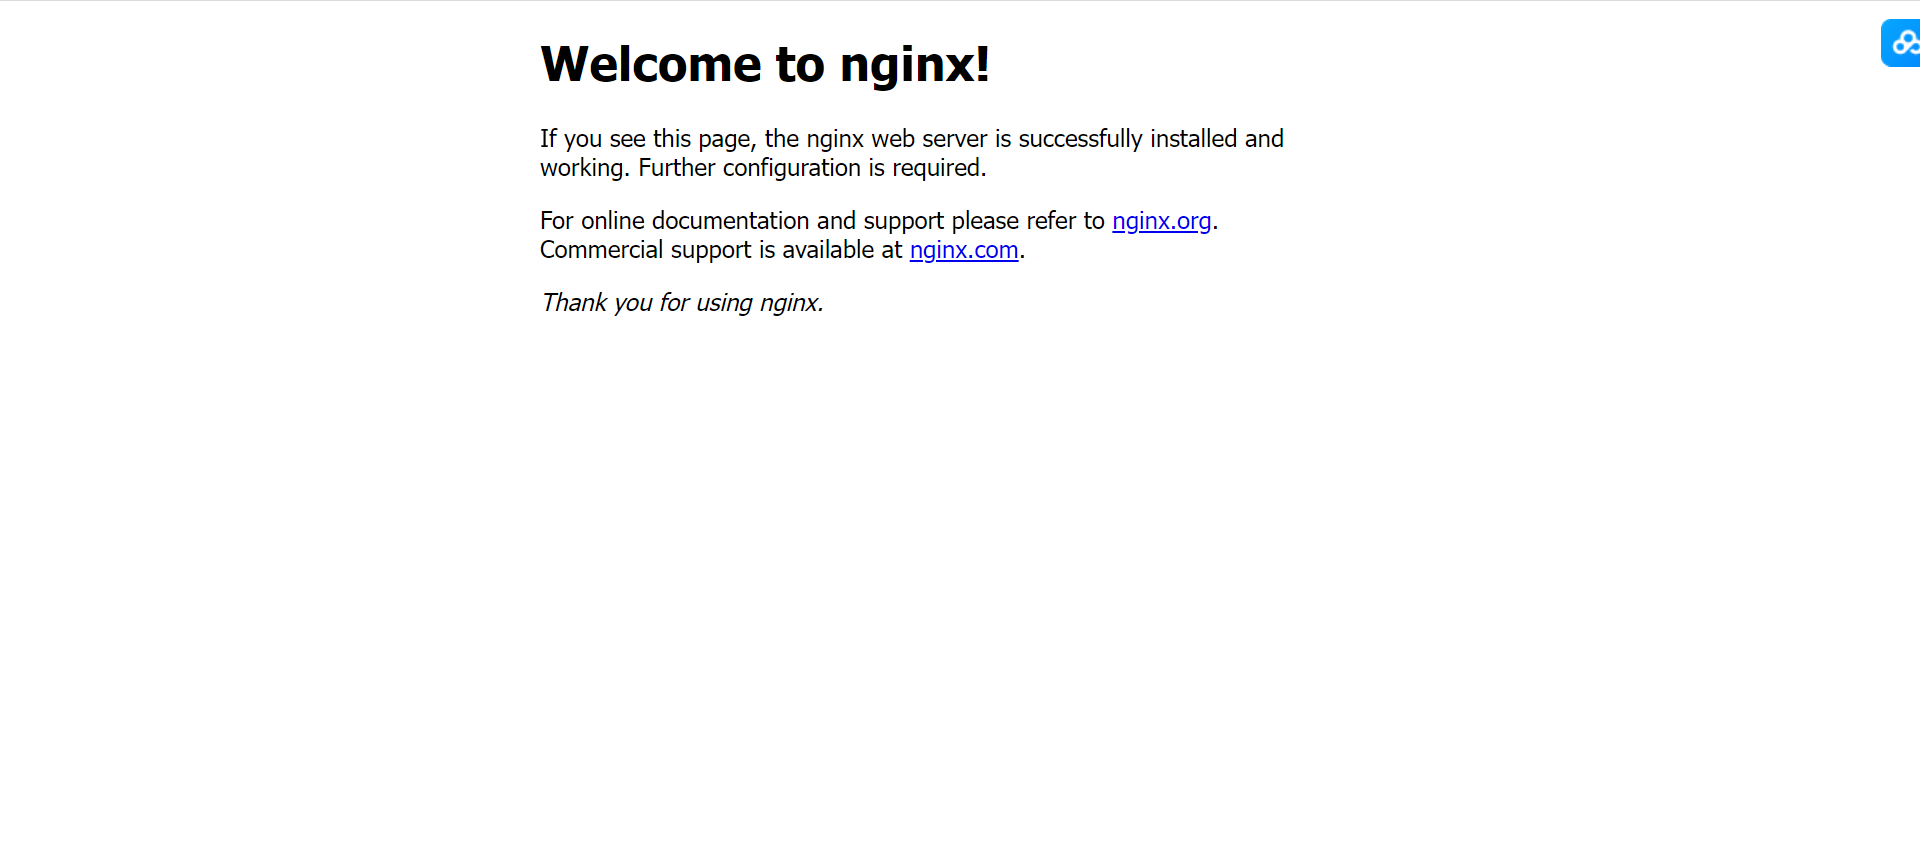
确定启动之后,页面访问:ip
即可访问到页面:
四、nginx启动、停止、重启、检测配置命令
#启动nginx服务
/usr/local/nginx/sbin/nginx
/usr/local/nginx/sbin/nginx -c  /usr/local/nginx/conf/nginx.conf

#停止nginx
/usr/local/nginx/sbin/nginx -s stop

#重启nginx
/usr/local/nginx/sbin/nginx -s reload

#检测nginx服务配置是否有误
/usr/local/nginx/sbin/nginx -t
五、常见问题
报错1:./configure: error: C compiler cc is not found
完整报错:
./configure: error: C compiler cc is not found
原因:没有编译环境
解决:yum -y install gcc gcc-c++
报错2:./configure: error: the HTTP rewrite module requires the PCRE library.
完整报错:
./configure: error: the HTTP rewrite module requires the PCRE library.
You can either disable the module by using --without-http_rewrite_module
option, or install the PCRE library into the system, or build the PCRE library
statically from the source with nginx by using --with-pcre=<path> option.
原因:缺少pcre-devel库
解决:yum -y install pcre-devel
问题3:./configure: error: the HTTP gzip module requires the zlib library.
完整报错:
./configure: error: the HTTP gzip module requires the zlib library.
You can either disable the module by using --without-http_gzip_module
option, or install the zlib library into the system, or build the zlib library
statically from the source with nginx by using --with-zlib=<path> option.
原因:缺少zlib-devel
解决:yum -y install zlib-devel
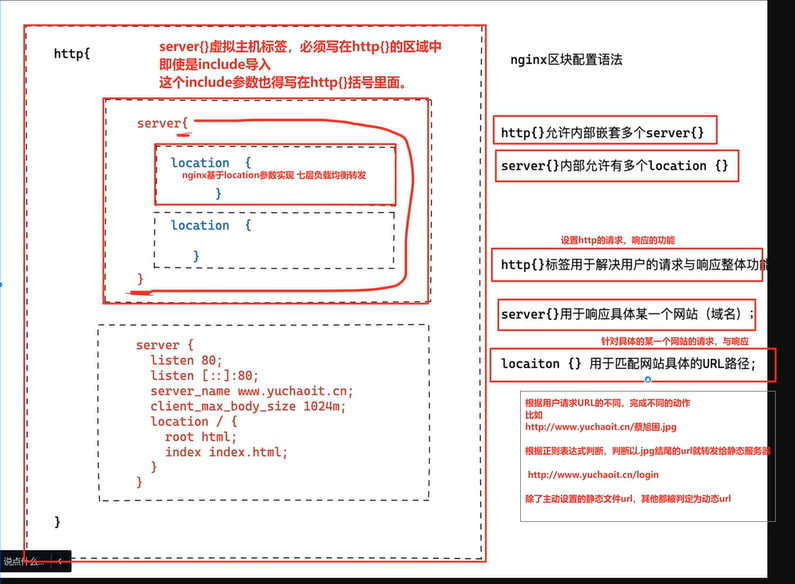
六、nginx配置模块详解
这里的图是二进制安装默认的配置,yum安装的与二进制安装的nginx,配置会有差异,但整体大概的说明都是一样的。
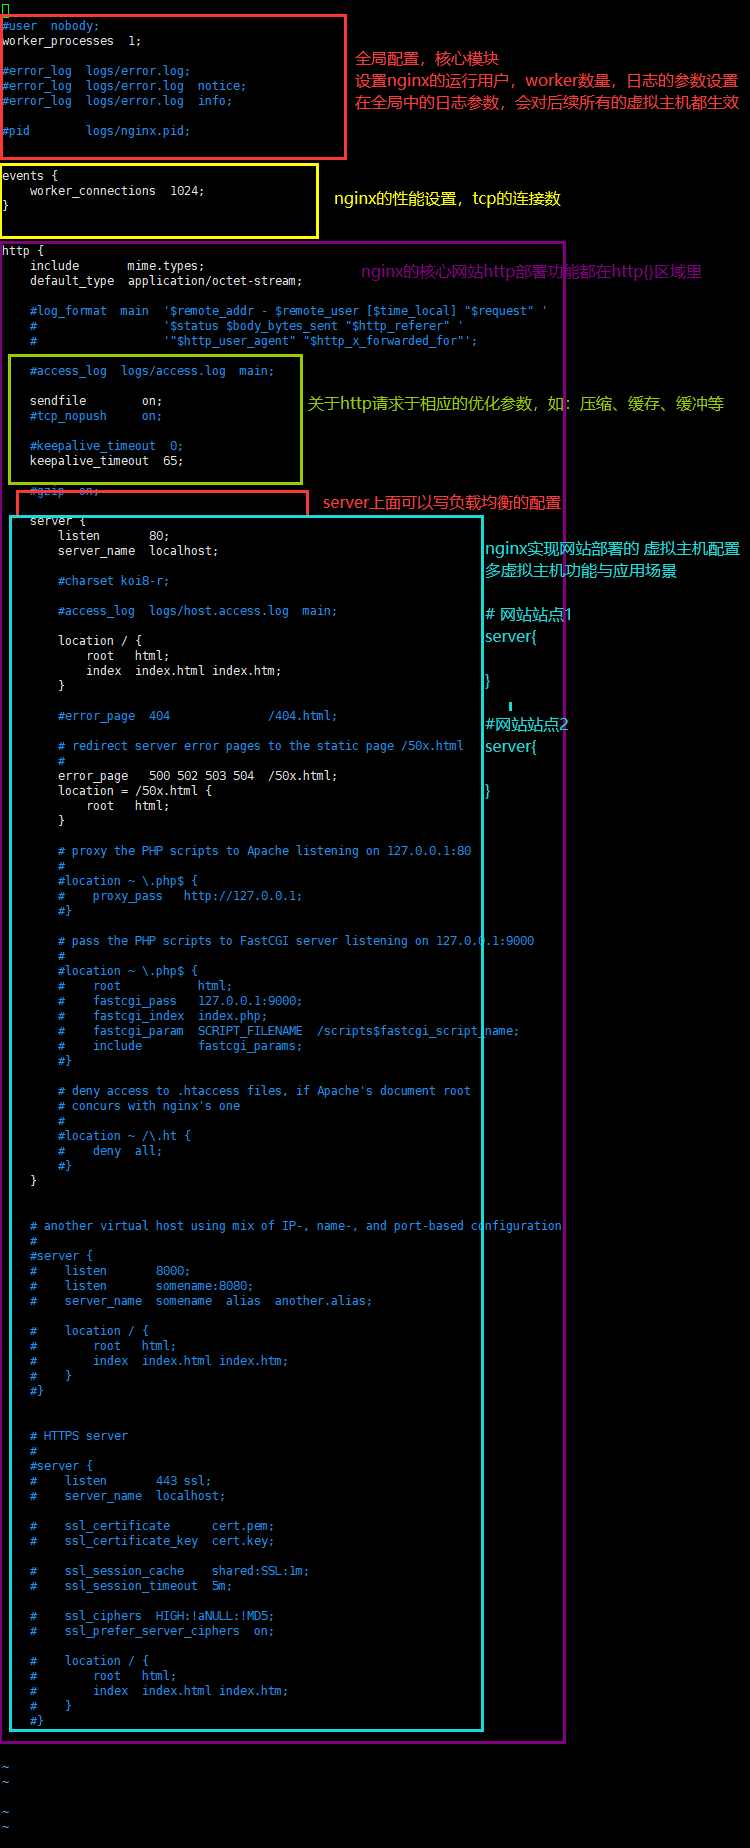
主要区域讲解:
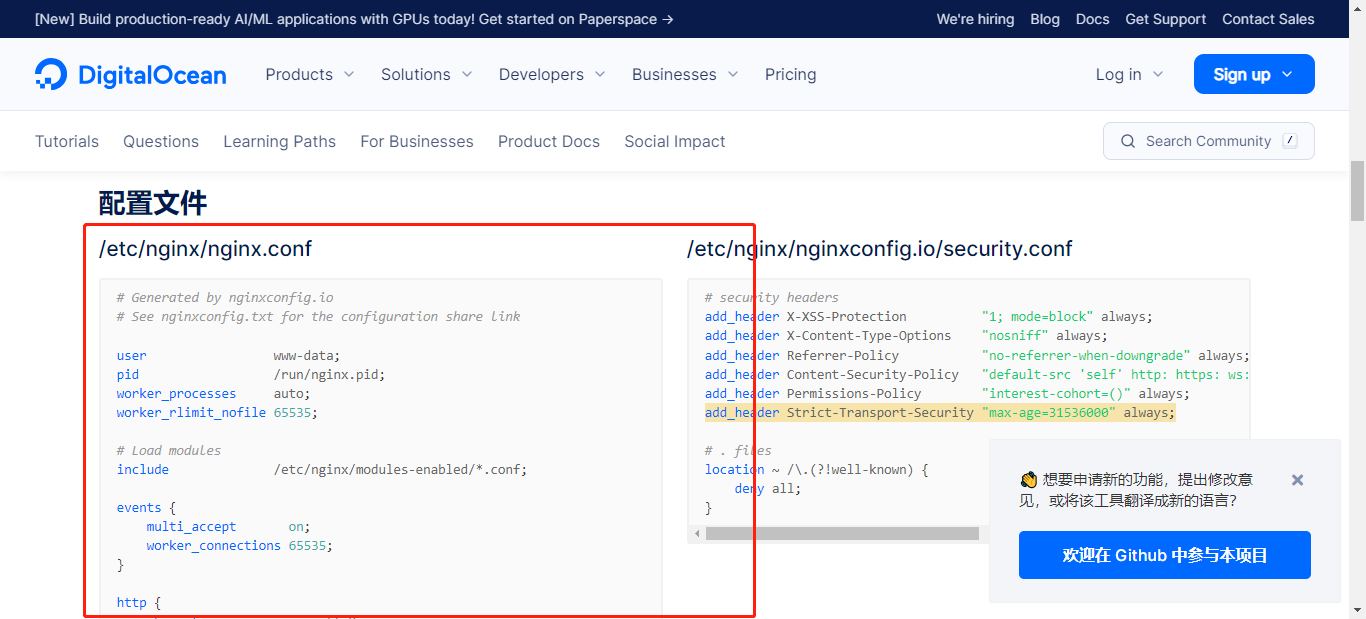
七、推荐一个自动生成nginx配置文件的网站
https://nginxconfig.io/
可以根据你的业务需求,自动生成负载的配置。
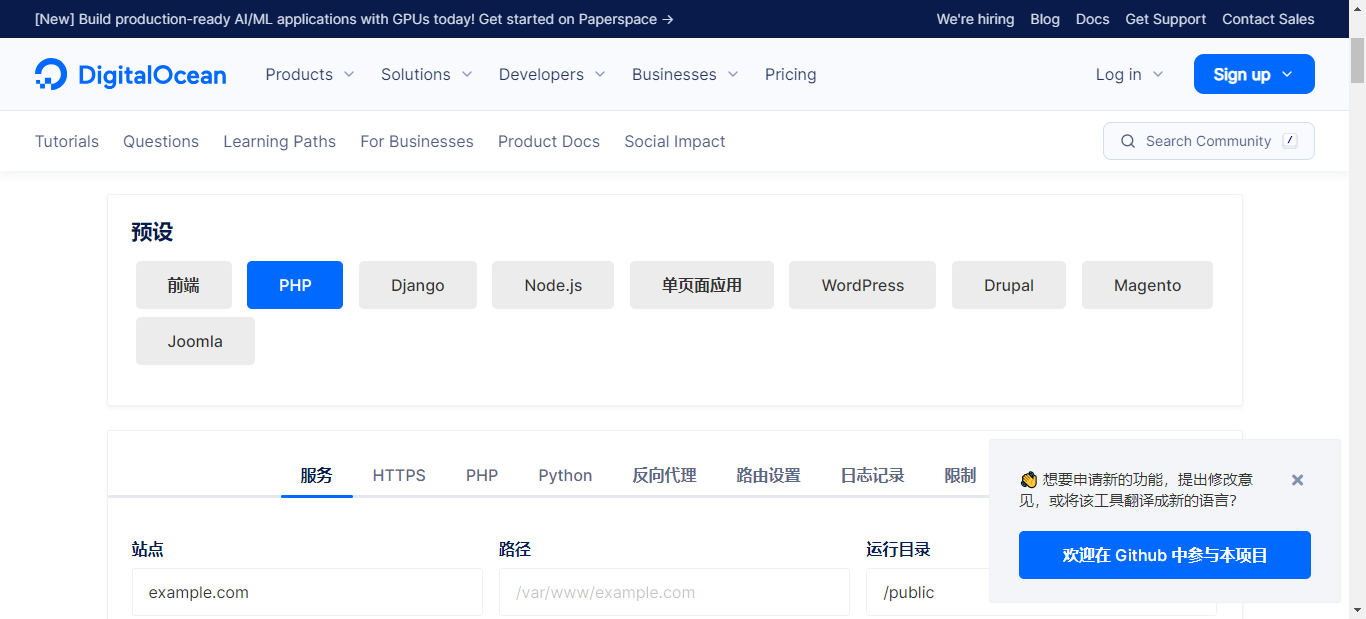
往下面翻,就可以看到配置文件了;
推荐一个优化nginx配置文件的页面:Nginx配置文件格式化
这里面还有很多格式化工具可以自己看看:https://tool.okcode.vip/
Nginx 404页面美化:Nginx 404页面美化
八、相关文章
| 文章标题 | 文章连接 |
|---|---|
| 【Linux】nginx基础篇 -- 介绍及yum安装nginx | https://liucy.blog.csdn.net/article/details/133928000 |
| 【Linux】环境下部署Nginx服务 - 二进制部署方式 | https://liucy.blog.csdn.net/article/details/132145067 |
| nginx配置负载均衡--实战项目(适用于轮询、加权轮询、ip_hash) | https://liucy.blog.csdn.net/article/details/133986013 |
| nginx快速部署一个网站服务 + 多域名 + 多端口 | https://liucy.blog.csdn.net/article/details/133986102 |
| 【Linux】Nginx一个域名https&一个地址配置多个项目【项目实战】 | https://liucy.blog.csdn.net/article/details/144442148 |
九、相关专栏
🐋 希望大家多多支持,我们一起进步!😄
🎉如果文章对你有帮助的话,欢迎 点赞 👍🏻 评论 💬 收藏 ⭐️ 加关注+💗